Case 013: The Beast Within
Celest St. Claire's Notes
Hey,
As I mentioned in my note, I’m sure that my conclusions will match Sullivan’s. That being the case, if you’ve already asked him about these clues, you probably won’t learn anything new here.
If you do choose to use this site, you’ll still need to email Sullivan about the Code Word for Club Mannaro’s back room. You’ll also need to email him the case’s Solution once you’ve figured out who is trying to convince Cam that he’s a werewolf.
If you haven’t emailed Sullivan yet, you can visit SleuthKings.com/Case-013 to send him your first email. When you want to address either of the issues above, just include the appropriate underlined word from above in the body of your email.
If you want to see my thoughts on any of the clues in your case file, just click the corresponding button below.
Things might make a little more sense if you know what a few of the wheels say. The three with the fang symbols say “Pounce,” “Werewolf,” and “Absent.” The circle with the paw and eye symbols says “Silver.”
Since we’ve got those wheels figured out, that means the fang symbols must stand for E, T, and N, which can be arranged to spell either “Ten” or “Net.” Seeing as the symbols look like they’re giving us a web address, “Net” makes the most sense.
Be sure to write down the other letters I mentioned, too. You’ll need them if you want to solve the rest of the message.
Don’t worry – there’s no shame in asking for help! When you read the words in order, they are: Banished, Terror, Followed, Shaggy, Werewolf, Absent, Suddenly, Pounce, Silver, and Resolved.
That kind of sounds like a weird story, doesn’t it? I bet Lydia followed Cam during his “episode” and saw something. If she did, she might have decided to keep on running, and is hiding somewhere now – alive and well. Or, maybe whoever is behind all of this caught up to her before she could tell Cam what really happened. All we can do is keep working through the clues if we want to get to the bottom of this.
Anyway, if we replace the symbols with the letters from the wheels and unscramble the sections, we get: StorageFiles.Net/Howls.
I think you’re going to want to check the website out. When you do, you’ll want make sure you’ve got the “Howl Translations” menu in front of you. If you need any help with it, take a look at what I’ve written for Clue 2!
If you haven’t worked out Clue 1 yet, you’ll probably want to take a look at it before you read any further. The website it’s pointing us toward has the rest of the howls and growls we need to make sense out of the “Howl Translations” Lydia wrote on the back of the menu.
You might notice that the howls and growls are similar to another well-known code when you stop and think about it. If you take a look through Lydia’s things, one of them should be able to help.
I’d also suggest checking whatever you find against the letters Lydia already wrote down. Doing that should help you figure out how the code has been adapted.
If you ignore the sounds themselves, the howls and growls are really similar to Morse Code. The howls are dashes and the growls are dots. To translate all of it, the Morse Code chart on the back of the calendar Lydia gave Cam should help.
When you listen to the recording with Morse Code in mind, it’s way easier to decipher. The message is “Cam’s Dying. Wolf True.”
If that’s not cryptic, I don’t know what is! On the website, Lydia said Cam was the one making these sounds. I wonder if that’s actually true – these don’t sound like sounds any human I know could make.
Regardless, since Lydia is the one who recorded this, I’d recommend taking a look at the stuff Sullivan found in her apartment. When you do, I think you’ll be able to start making more sense out of things.
One thing that should help is that several of the symbols on the front of the club ad also appeared on Lydia’s “Howl Translations” chart. What might help you even more is to know that those symbols, and the letters they stand for, also correspond to the “Forget My Sin” section on the back of the club ad.
There are also a lot of wolves, flies, bats, and zombies on the front of the ad. The other symbols (from the “Howl Translations” chart) are trying to let us know which groups of them to use and how to position them. You’ll just need to figure out how it all fits together.
Don’t feel bad – this one is tricky. I was up half of the night trying to figure it out when I first swiped a copy of the club ad from Sullivan’s office.
Like I mentioned before, the symbols – and the letters they stand for – on the “Howl Translations” sheet correspond to the letters in “Forget My Sin” on the back of the ad.
It’s probably easiest if I give you an example of the steps I went through to find the hidden message.
On “Howl Translations,” the radioactive symbol is beside “M.” On the front of the ad, the radioactive symbol is touching the word “Rebels.” What’s more, there is also a wolf, a bat, a zombie, and a fly underneath “Rebels” and beside the blank area under “Forget My Sin” on the back.
The trick here is to look at the blank space under “Forget My Sin” as a grid. The letters in “Forget My Sin” each represent a column. The creepy critters to the left represent rows.
Since we know the radioactive symbol is associated with the “M” column – thanks to the “Howl Translations” chart – that’s where the letters from “Rebels” will go. We know which letters to use because they have the wolf, zombie, etc. symbols beneath them. We’ll put each letter in the same row as the symbol beneath it. In this case, here’s what it looks like:
R
S
B
L
If we do that for every row and column, we get “Password – poster who said. Connect bat, zombie, woIf, fly.”
The password has to be the code word Sullivan needs in order to get into the club’s back room. If you want to find it, you’ll want to take a look at the poster Sullivan labeled as Clue 4.
Remember, once you know what the code word is, you’ll need to email it to Sullivan and include the phrase Code Word in your email so that he knows what you’re talking about. If you haven’t emailed him about the case yet, there’s a link at the top of the page that will let you do so.
The club ad labeled Clue 3 told us how to connect the symbols on the poster. If you haven’t worked through that yet, you’ll want to start there first.
If you’ve already worked through Clue 3, you’ll want to focus on using straight lines to connect the four symbols closest to one another in the correct order without crossing a reaper or a ghost. After you connect four of the symbols, you’ll repeat the pattern with the next four, and so on. When you’re done, your lines will spell something out.
Here’s what you get when you connect everything in the correct order: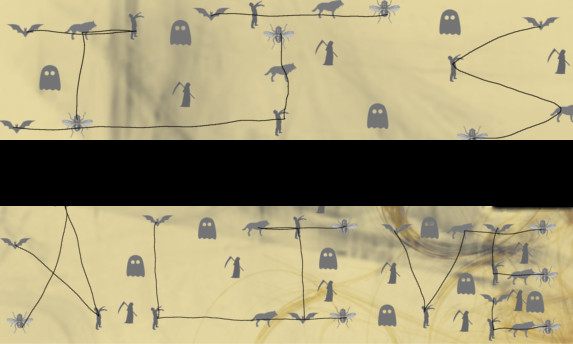
In case you’re having trouble reading it, it says “It’s Alive.”
Before you get too excited, I don’t think that’s the code word Sullivan needs. Clue 3’s club ad told us that these words are the key to helping us figure out the code word – we just need to know how. If you take another look at Clue 3’s message, you should see the beginning of a question before the symbol order is given. The answer to that question should be the code word.
When you’ve figured out the code word, you’ll need to email it to Sullivan so that he can check the club’s back room out. If you’ve already emailed him about this case, you can just respond to his last email and include the phrase Code Word along with what you think it is. If you haven’t emailed him yet, there’s a link at the top of this page that will let you do so.
The rest is up to you! Good luck!