Case 203: The Cure
Celest St. Claire's Notes
Hey,
As I mentioned in my note, I’m sure that my conclusions will match Sullivan’s. That being the case, if you’ve already asked him about these clues, you probably won’t learn anything new here.
If you do choose to use this site, you’ll still need to email Sullivan about the Location where the mastermind meets the drug dealer. You’ll also need to email him the case’s Solution once you’ve figured out how we can access the cure.
If you haven’t emailed Sullivan yet, you can visit SleuthKings.com/Case-203 to send him your first email. When you want to address either of the issues above, just include the appropriate underlined word from above in the body of your email.
If you want to see my thoughts on any of the clues in your case file, just click the corresponding button below.
So far, I’m pretty sure that when two zombie hands are side-by-side, it means there are two different symbols in the cluster they’re pointing you toward. The first hand gives the total number of one symbol type in the cluster, and the second hand gives the total number of the other type of symbol in the cluster. That being the case, the total number of fingers should equal the total number of symbols we’re looking for in the cluster.
Good news – I figured out what the zombie fingers are telling us!
The fingers on each hand are telling us which symbol grouping we need to find, right? Once we find the grouping, we have to look at the letter above it.
Here’s an example: the first hand has three fingers, which means we need to find a letter with a grouping of three identical symbols beneath it. The only grouping that consists of three identical symbols is beneath the letter “A.”
The next row has two separate hands that we need to look at. The first hand has one finger, while the other has three. What that’s telling us is that we have to find a symbol grouping that has two different types of symbols. One of the symbol types only appears once, and the other symbol type appears three times. There’s only one instance of this happening, and it’s beneath the letter “L.”
When you run through the rest of the flyer and find the correct symbol groupings and their associated letters, they spell out the word “alive.” Judging from the note on the flyer, that must mean that the keyword must be “alive.”
Wait a second, didn’t the drug dealer want Sully to give him some kind of keyword? I wonder if this is what he was looking for. It might be a little late now, but I wonder if it’s worth keeping the keyword in mind as we look at the menu (Clue 2).
With any luck, this will bring us a little closer to finding the location where the drug dealer meets with his boss. Once you’ve figured out where the location is, be sure to send Sullivan an email. When you do, include the word Location so he knows what you’re talking about. If you haven’t emailed him yet, you can do so at SleuthKings.com/Case-203.
I’ve made some good headway with this one! I know how we can make letters out of the prices. Each price is telling us which letter in the alphabet we need to use. For example, $1 is A, $2 is B, etc.
When you’ve replaced the prices with letters, you’ll then have to arrange them correctly according to a keyword – probably the one we found from Clue 1!
I got it! In order to make a coherent message out of the letters, the trick is to treat the sections like columns and rearrange them so that the top row spells “alive” – the keyword we found thanks to Clue 1. Here’s what it looks like when you do that:
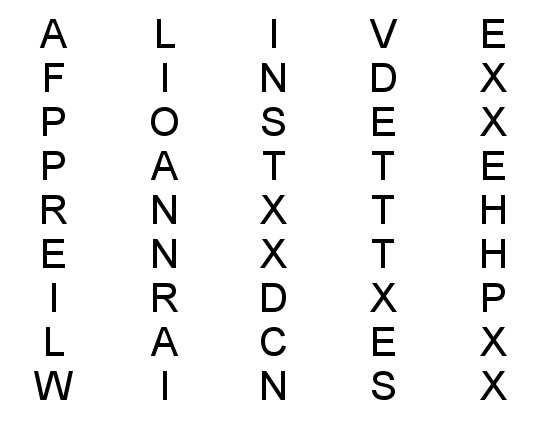
If you treat the “X’s” like spaces, the message reads:
“Find pose pattern, then third place wins.”
There are plenty of poses on the exercise sheet Sully found – which he marked as Clue 3. I bet this is telling us how we can find a hidden message on it!
With any luck, this will bring us a little closer to finding the location where the drug dealer meets with his boss. Once you’ve figured out where the location is, be sure to send Sullivan an email. When you do, include the word Location so he knows what you’re talking about. If you haven’t emailed him yet, you can do so at SleuthKings.com/Case-203.
I’m getting really frustrated with this! There just isn’t a pattern between the individual numbers. My only guess is that maybe we need to try adding each row or column together. A pattern might emerge if we do that. If not, I’m out of ideas!
When you find the pattern and know what the missing numbers are, each number in the group should tell you which pose title to look at. Even so, I think we’re still going to need to figure out which specific word in each title we need to look at. The good news is, I’m pretty sure Clue 2’s message might have given us a hint about that.
I finally figured out this pattern!!
The trick is to look at the sum of each row. The first and second rows are each missing a number, so they aren’t helpful, but the rest are. The 3rd row equals 29, the 4th row is 37, and the 5th row is 29. That means the 1st row should also equal 29, and the 2nd row should equal 37.
Assuming I have the correct pattern – which I’m confident I do – the 1st row’s missing number is 2, and the 2nd row’s missing number is 9.
Next, you have to figure out which word in each pose’s name to look at. Clue 2’s message mentions that “Third place wins,” however, which I think means we need to look at the 3rd word in each applicable title. When you do that, the message says:
“Compass finger points to dírection: east, southwest, north, south, east, northeast, southeast, northeast, southwest, southeast, south, northwest, east, south, west.”
This is great – it’s exactly what we’ve been looking for! This should help us use the map to figure out where the mastermind meets with the drug dealer. Once you know where the map is pointing us, be sure to send Sullivan an email. When you do, include the word Location so he knows what you’re talking about. If you haven’t emailed him yet, you can do so at SleuthKings.com/Case-203.
I know the compass and the symbols around it are important, but I don’t think there’s enough information on the map itself for us to use them.
The button I happened to find in the drug dealer’s pocket fits inside the compass – which is probably important – but I’m not certain how to use it yet. I’m pretty sure we need to find a message with cardinal directions in it. When we do, I bet we’ll need to rotate the button according to those directions.
Something tells me that Clues 1-3 should be able to help us find the directions we need.
Clue 3’s message told us that the finger on the button should point to the cardinal directions it lists, right? As you rotate the button, you’ll also want to pay attention to the list of symbols drawn on the map. The first cardinal direction is most likely associated with the first symbol in the list.
If I’m right about the connection between the cardinal directions and the symbols, that means we’ll want to look at the letter on the button that lines up with the appropriate symbol beside the compass when the finger points to the given direction.
For example, the first cardinal direction the button’s finger should point at is east. The first symbol on the map is the square symbol. When you rotate the button so that the finger points east, the letter “A” on the button lines up with the square symbol beside the compass.
One note I’d like to make here is that I doubt the square symbol will always stand for “A.” I’m pretty sure it is fluid and will stand for whatever letter lines up with it when the finger points to the specified direction on the compass it’s supposed to.
When you’ve finished decoding the symbols, I think they should spell the name of the location we’re looking for. Once you know where the location is, be sure to send Sullivan an email. When you do, include the word Location so he knows what you’re talking about. If you haven’t emailed him yet, you can do so at SleuthKings.com/Case-203.
Hopefully we’ll be able to find something useful when Sully and I check the location! We’re counting on you!