Case 022: The Trouble With Wizards
Celest St. Claire's Notes
Hey,
As I mentioned in my note, I’m sure that my conclusions will match Sullivan’s. That being the case, if you’ve already asked him about these clues, you probably won’t learn anything new here.
If you do choose to use this site, you’ll still need to email Sullivan if you need help trying to figure out the Final Password on the www.StorageFiles.net/Wizard site. You’ll also need to email him the case’s Solution once you’ve figured out where Jay hid the evidence.
If you haven’t emailed Sullivan yet, you can visit SleuthKings.com/Case-022 to send him your first email. When you want to address either of the issues above, just include the appropriate underlined word from above in the body of your email.
If you want to see my thoughts on any of the clues in your case file, just click the corresponding button below.
What’s helped me with this one so far is breaking down exactly what we’re looking at.
Like Sullivan mentioned in the Clue Analysis, the first picture in each row is telling us which spell to focus on.
I’m pretty sure that the next picture is telling us which line of the spell to look at. What’s confusing, is that some of the rows on the first page of the spell book have multiple pictures side-by-side that are identical. It threw me for a few minutes but, now, I think I’ve got it. Not only are the images after the first picture telling us which line to read, they’re also telling us which word to look at.
For any row that has only a single image after the first picture, that means we need to look at the first word in that line. If a row has three identical images side-by-side, we’ll want to look at the third word in the line.
Even with all of that said, we’re still left with a Roman numeral at the end of each row. Before we can figure out what the message is trying to tell us, we’ll need to figure out how the Roman numeral comes into play.
I’ve got it.
Like I mentioned before, the trick is to break things down and try to figure out what each image is telling us.
The first picture tells us which spell to look at. The second picture tells us which line in the spell to look at. It (and/or any identical images beside it) also tells us which word to look at in the line. As for the Roman numeral, I finally figured out that it’s telling us which letter to look at in the aforementioned word.
When you put it all together, it works like this:
The first row begins with a picture of some books. That means we need to look at the “Lover’s Quarrel” spell. Beside the book is a picture of a single frog, which means we need to look at the first word in line six. Since the Roman numeral at the end of the row is two, it’s telling us to look at the second letter in the first word in line six, which is “S.”
If we follow that pattern for the rest of the sketches, we get the word “snitch.”
The word “snitch” by itself isn’t exactly helpful. Lucky for us, however, I remembered seeing a wand on the www.StorageFiles.net/Wizard webpage that matches the wand on the spell book’s cover. The section is password-protected but, as you’ve probably already guessed, “snitch” (all lowercase) is the password. If you haven’t already, I’d recommend taking a look at that section on the webpage as soon as you can.
My advice is to grab a pair of scissors and cut the schedule into squares along each of the lines – at least, that’s what I did. From there, I think the trick is to rearrange the pieces so that we can make the background image whole.
Once the background has been reassembled correctly, I think the small marks on the front of the schedule will give us one of the passwords for the www.StorageFiles.net/Wizard webpage.
I’m sure that you also noticed the symbols on the back of the schedule, but I wouldn’t worry about trying to decode them yet. Instead, I think we’re better off trying to get a password from the front of the schedule.
Here’s what the schedule looks like once the pieces have been rearranged to make the background image whole:
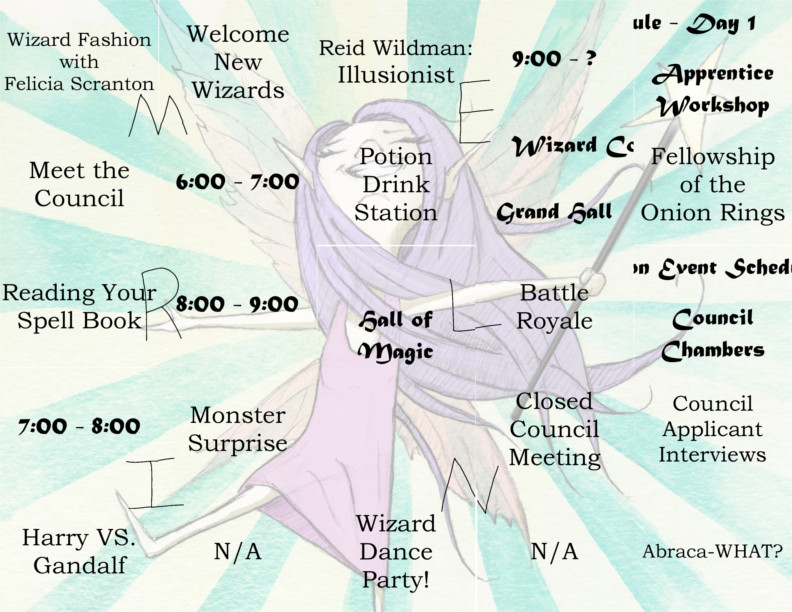
Now that it’s lined up, the random markings on the front of the schedule spell out “Merlin.” Since one of the password-protected sections on the www.StorageFiles.net/Wizard webpage matches the dancing fairy on the schedule, I decided to try “merlin” (all lowercase) as the password for it. Good news – it worked!
You’ll want to take a look at the “dancing fairy” section of the webpage as soon as you get the chance.
So far, I’ve figured out that the pictures on the front of the note are of sugar, honey, lemon, and dry ice. Unfortunately, I haven’t found any connection between those things and anything else. Even so, I’ve got the sneaking suspicion that the potion drink list might be what we need to take a look at.
As a quick reminder, I do want to say that, right now, I think we should focus on figuring out what the pictures on the front are. There are symbols on the back, too, but for now, we need to focus on figuring out what password the pictures are pointing us toward.
I was right – the drink menu is the ticket. One of the non-alcoholic drinks is made with sugar, honey, lemon, and dry ice; it’s called “Dragon Breath.”
Although the note didn’t have any pictures that match up with the www.StorageFiles.net/Wizard webpage, the potions at the top of the drink menu do. If you try the password “dragonbreath” (all lowercase and all one word), the section should unlock for you.
Judging from the information in this section, I think we should finally be able to decode the weird symbols that are all over everything. I’d suggest taking a look at the password-protected section as soon as you can so you can learn more.
I haven’t decoded all of the symbols yet, but I have figured out the vowels:
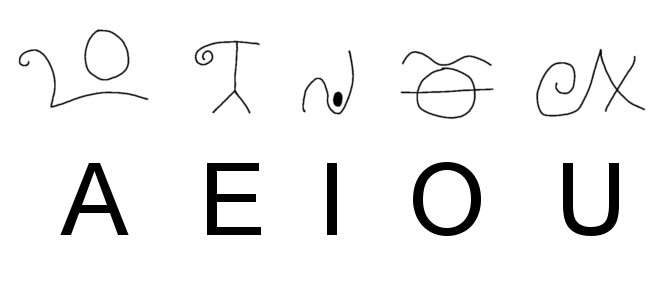
That should help the message on the last page of the spell book to look a little clearer now. Once you’ve finished translating the message, it should tell you what you’re looking for on the flyer.
I’ll post another update once I’ve completely finished decoding the message on the last page of the spell book.
Here’s what the spell book’s message says:
“Find the five hidden differences between the flyer and poster. The flyer will lead you to the password.”
There isn’t much on the flyer or poster besides symbols, so that’s where I focused on looking for differences. It took me a while to pick them all out, but I finally found the five words that are different on the flyer. Here’s what they are:
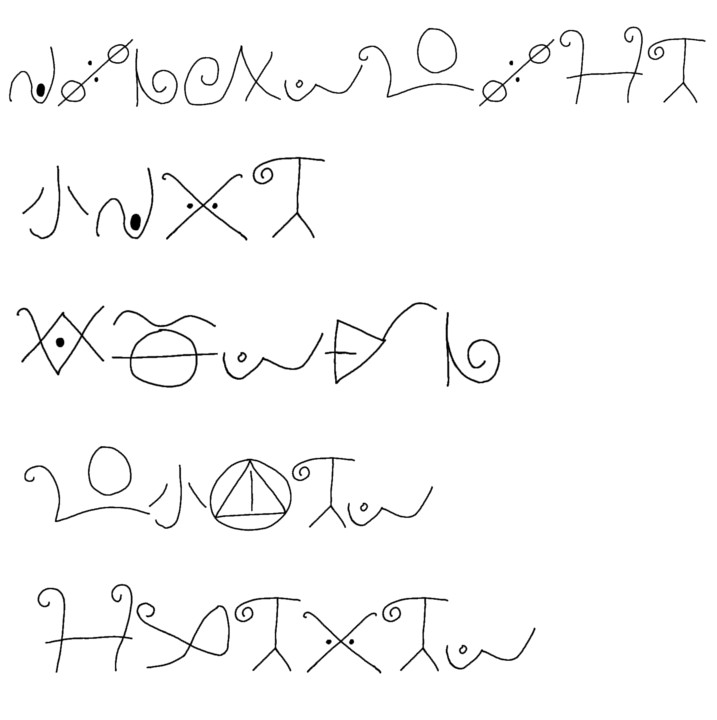
So far, I’ve only had the chance to decode this word:
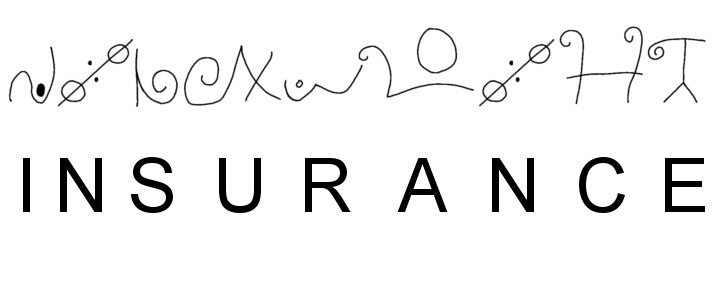
I’m pretty sure this is telling us to look at Jay’s letter – the one with the word “Insurance” at the top. If we want to know what we’re looking for in Jay’s letter, I think we’ll need to decode the other four words above. Once we’re done, the message should tell us how to find the password for the “hat” section of the www.StorageFiles.net/Wizard page.
I finally finished translating the five words from the flyer that were different from the poster. They are: insurance, five, words, after, clever.
I took the message literally and found the word “clever” in Jay’s letter. Once I did, I looked at the fifth word after it, which is “magic.” That means the password to the “hat” section on www.StorageFiles.net/Wizard is “magic” (all lowercase).
With that, I think it’s time for me to bow out of this case. I know we haven’t figured out the final password, yet, but I’m OK with that. Sullivan is already touchy about this one because of what his brother did to him, so the last thing I want to do is to get into the middle of a family feud – Sullivan and I haven’t been dating long enough for that!
Of course, if you need some help figuring out the final password, you can send Sullivan an email at www.SleuthKings.com/Case-022. When you do, let him know that you need help with the Final Password, and I’m sure he’ll be able to point you in the right direction.
Good luck!