Case 023: Search for the Hidden Treasure
Celest St. Claire's Notes
Hey,
As I mentioned in my note, I’m sure that my conclusions will match Sullivan and Asuna’s. That being the case, if you’ve already asked them about these clues, you probably won’t learn anything new here.
If you do choose to use this site, you’ll still need to email Sullivan about the case’s Solution once you’ve figured out where Novelda Bright’s treasure is hidden.
If you haven’t emailed Sullivan yet, you can visit SleuthKings.com/Case-023 to send him your first email. When you want to tell him where the treasure is hidden, just include the word Solution in the body of your email.
If you want to see my thoughts on any of the clues in your case file, just click the corresponding button below.
I read Asuna’s suggestion from her clue analysis about finding the words in the word search. I think she’s on to something.
I followed her suggestion and crossed out all of the words from Novelda Bright’s note in the word find. When I was done, the only words left were “ran,” “arose,” “team,” “firmly,” and “book.”
Judging from Novelda’s note, I think we’re supposed to find these words somewhere else and read whatever comes after them. The note mentions getting her “life’s final message across,” which is telling us more than it lets on. In fact, I think it’s telling us to look at her obituary, which is exactly what I’m going to do next.
It looks like I was right – Novelda’s obituary was the key to figuring this out. She really was dedicated to making this treasure hunt happen if she incorporated it into her own obituary.
Novelda’s note said that we “just need to find the words and see what comes after them,” right? After I found the words in her obituary, I did just that – I read the rest of the sentence that comes after them.
For instance, “arose” – the second word – is in this sentence:
“I still cannot believe how much love arose from the library.”
When you read the words after “arose,” you get “from the library,” which is a part of Novelda’s real message.
After you do that for all of the words, you get:
“North from the library. Sudoku stars give words to read in sentences.”
It seems like she’s giving us two sets of instructions here, doesn’t it? The first is one of the directions that we’ll need to use with the map. The second sounds like instructions for how to find her second message, which is hidden in Clue 2.
One last thing before you get started with Clue 2: if you haven’t already, I’d recommend writing down the information Novelda gave us here. We’ll probably need it later on.
After looking at the quilt pattern, I can see why Asuna compared it to Sudoku. I think she’s right. Assuming that she is, here is a picture of what I’ve been able to solve so far:
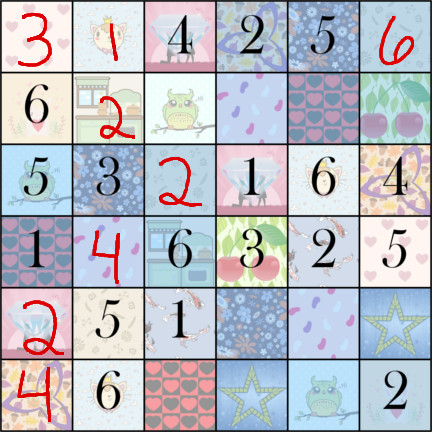
Novelda’s message from Clue 1 told us which boxes to pay special attention to. Once we know what numbers go in those boxes, we should be able to figure out which words to read in her notes.
That’s OK. Here’s what the quilt pattern looks like once it’s completely filled in:
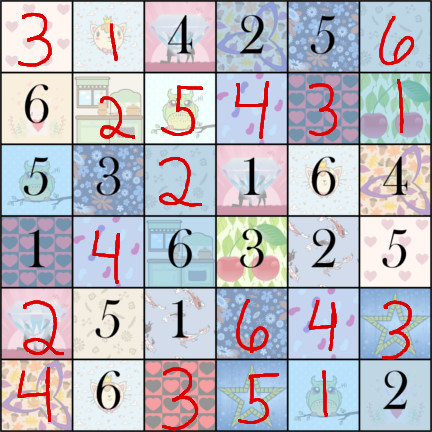
As long as I’ve got it filled out correctly, that means the boxes with stars have the numbers 3 and 5 in them. Thanks to Novelda’s message from Clue 1, we know that means that we’ve got to read the 3rd and 5th word in every sentence.
Here’s what the message says when you do just that:
“Left after passing next place. Cut Crisp and Barry from music schedule. Align note with crossbones.”
Now we’re getting somewhere. Novelda really went all-in with this treasure hunt, didn’t she? That’s what makes this so much fun, though!
If you haven’t already, I’d recommend writing this information down – we’ll need all of Novelda’s instructions if we want to help Asuna find her treasure before that bully does.
Novelda’s message from CIue 2 mentioned that we need to cut some peoples’ pictures out of the Classical Discovery program schedule. Then, once we’ve done that, we’re supposed to line the musical note on it up with the crossbones on the map, right?
That’s easier said than done, unfortunately. As far as I can tell, Novelda must have spun the program schedule all around as she was putting this together. That being the case, we’re going to have to figure out how to correctly orient the program schedule on each set of crossbones.
In addition to turning the program schedule all around, we’re also going to need to make sure we read everything in the correct order. I’m sure you’ve noticed, but there are numbers near each set of crossbones on the map. I think that those numbers are telling us the order in which we’ll have to read things.
There’s one more thing – the symbols all over the map match the ones on the performance calendar marked as Clue 4. If we’re lucky, maybe this will be able to help us start making sense out of it when we’re done.
I blacked out areas on the map to show what symbols and letters the program schedule highlights in each section. Here’s what it looks like when everything is all laid out:
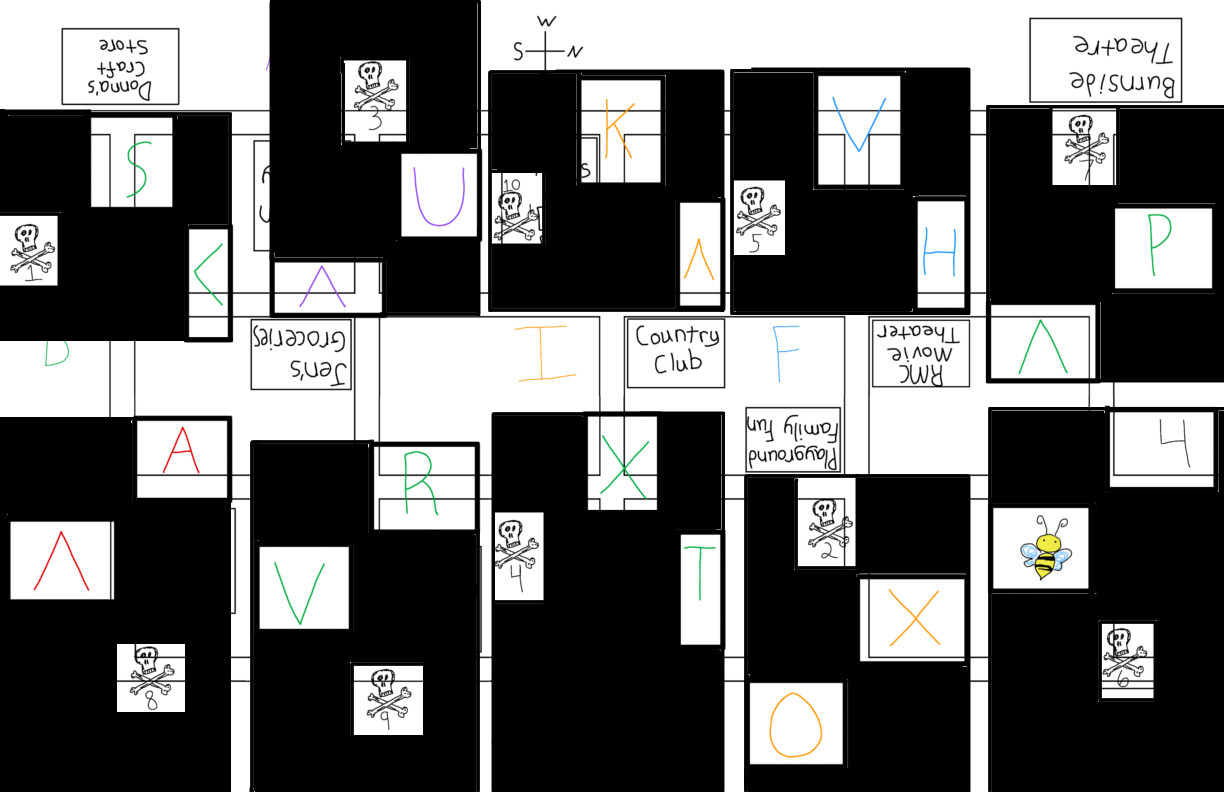
I also left the crossbones and their numbers visible, too, so that I knew which order to read everything in. The message says:
“South B4 (before) Park.”
Just like I thought – she’s giving us another direction to the treasure! This is really starting to get exciting!
Oh, before I forget, you’ll probably also notice that each letter (except for “B4”) is paired with a symbol. I think the letter and symbol pairs are meant to give us the letter that each symbol stands for, which should help us make sense out of Clue 4.
Good news – I’ve figured out quite a few things about this, which should help.
First, I used Novelda’s season ticket to figure out which performances she was scheduled to attend. Then, I found those performances on the calendar and copied each of the symbols written in those sections down. Here’s what they look like:
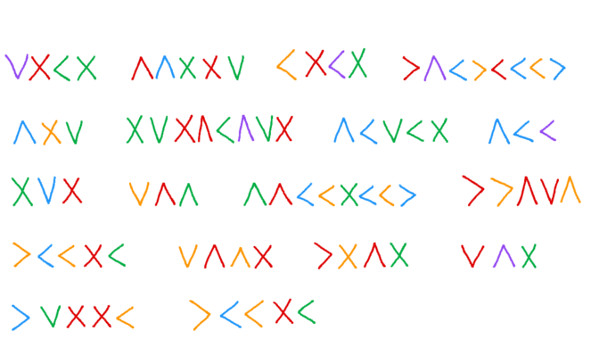
Thanks to Clue 3, we also know which letters several of the symbols stand for:
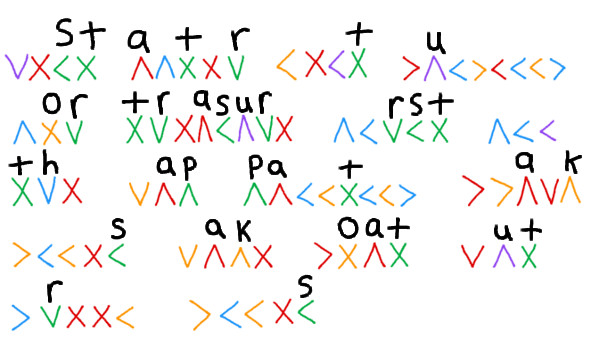
With that written out, my next step is to try to figure out what the other symbols stand for.
It took a while, but I finally figured out how to read the symbols. The message says:
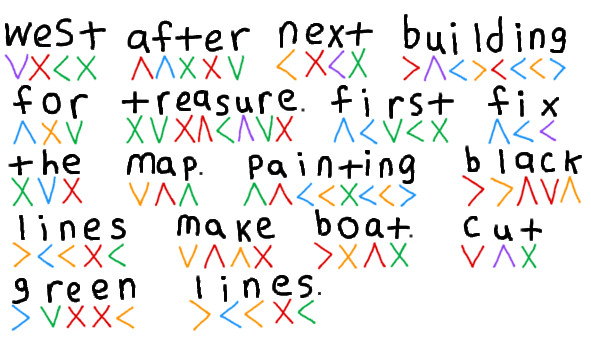
From the sounds of it, this should be the last direction that we’ll need to follow on the map to find the treasure.
If only it were that easy, though! Before we can use the map, we have to rearrange it by using the painting on the other side.
I don’t know how far Asuna’s bully has been able to make it through all of this but, hopefully, this will trip her up for a little while so that Sullivan and Asuna can catch up.
Once you’ve rearranged the painting correctly, I think you’ll want to tape it together so that you can look at the map on the back without running into any problems. Of course, if you need help trying to read the map, you can email Sullivan and Asuna to ask them about it. When you do, you’ll want to include the phrase “Map Directions” in the body of your email so that they know what you’re talking about.
If you haven’t emailed them already, you can do so at www.SleuthKings.com/Case-023.
Since I’m really getting into this, too, I’ll go ahead and try to put the map back together myself, as well. If you’d rather see my progress, you can check out the “Treasure Map” section on this page.
The first step to rearranging the map correctly is to cut the painting up along the green lines. Here’s a picture of what that looks like:
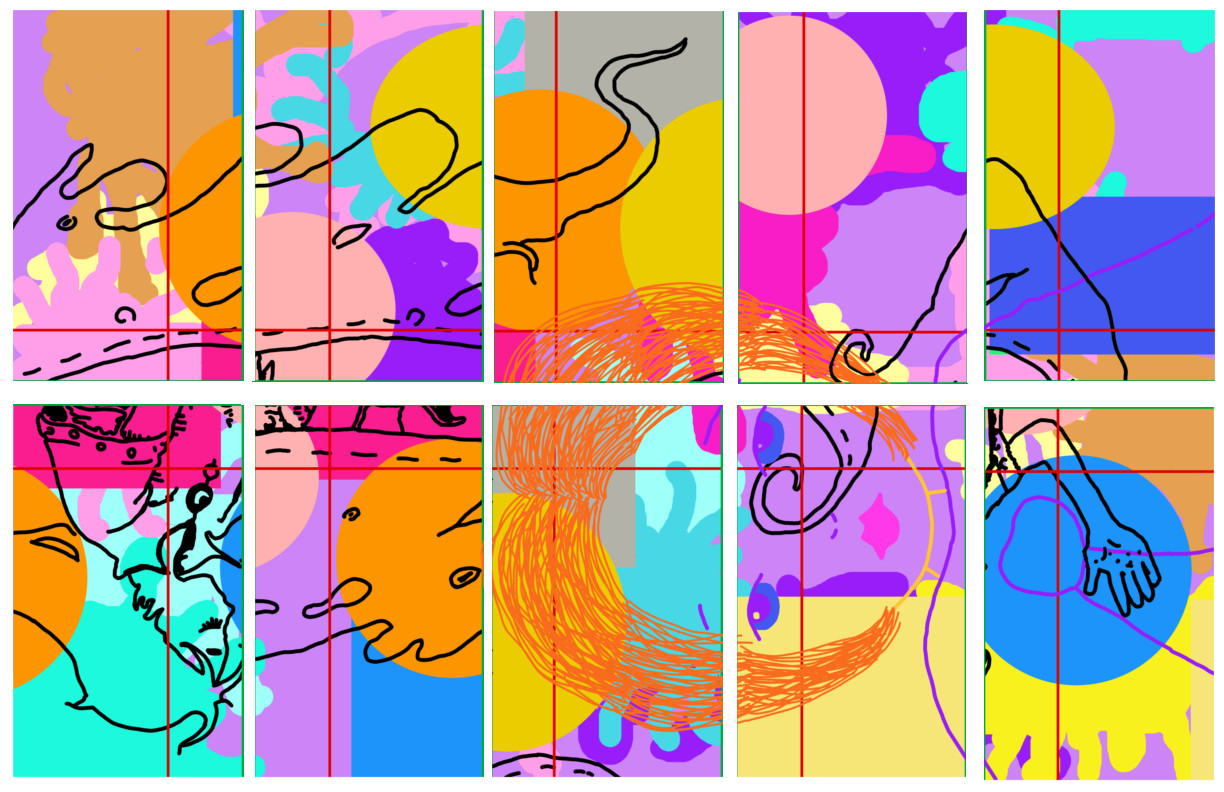
With that done, our next step is to make a boat out of the painting’s black lines. Once you’ve done that, you’ll probably want to tape the pieces together so that you can use the map on the back.
I’ve managed to put together half of the picture so far:
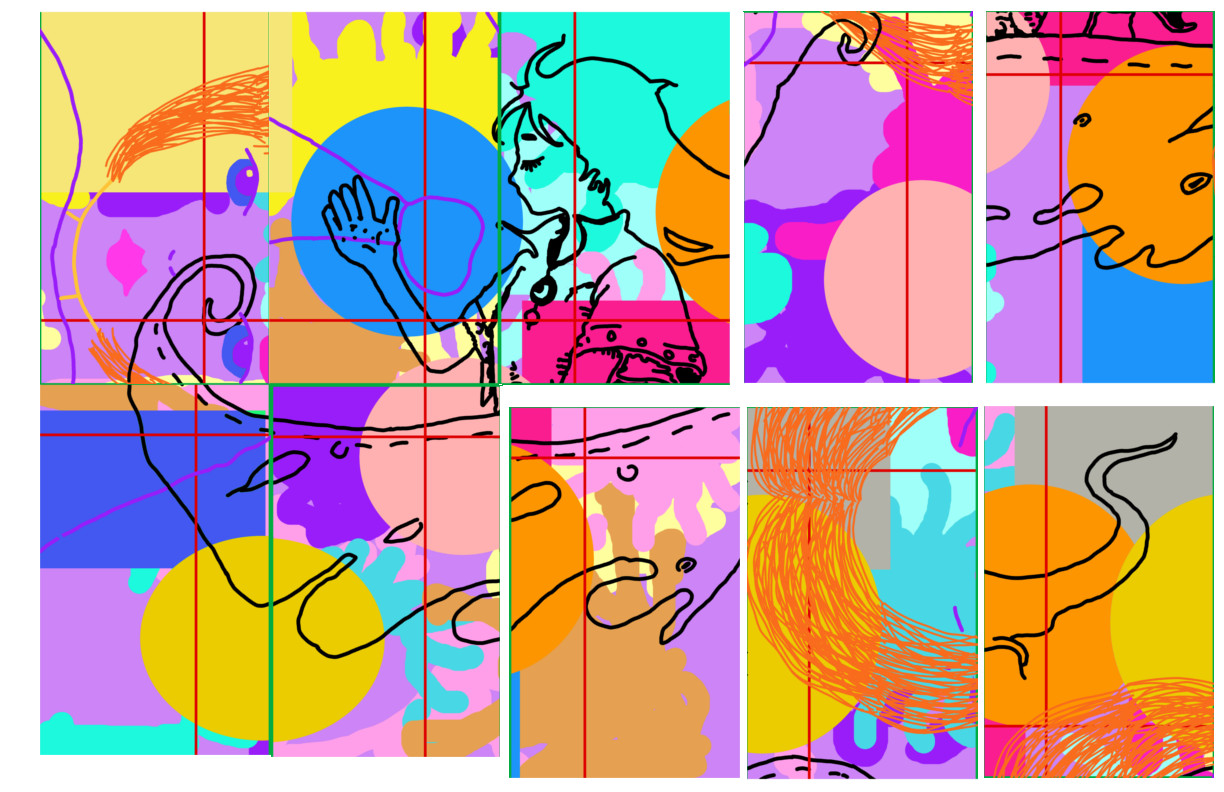
I’m going as fast as I can! There’s no way that I want Asuna’s bully to steal this treasure from her!
If you need help reading the map once you’ve put it back together, you can send Sullivan and Asuna an email about it. When you do, include the phrase Map Directions in the body of your email so that they know what you’re talking about. If you haven’t already, you can send them your first email at www.SleuthKings.com/Case-023.
Good news – I finally finished putting the painting back together:
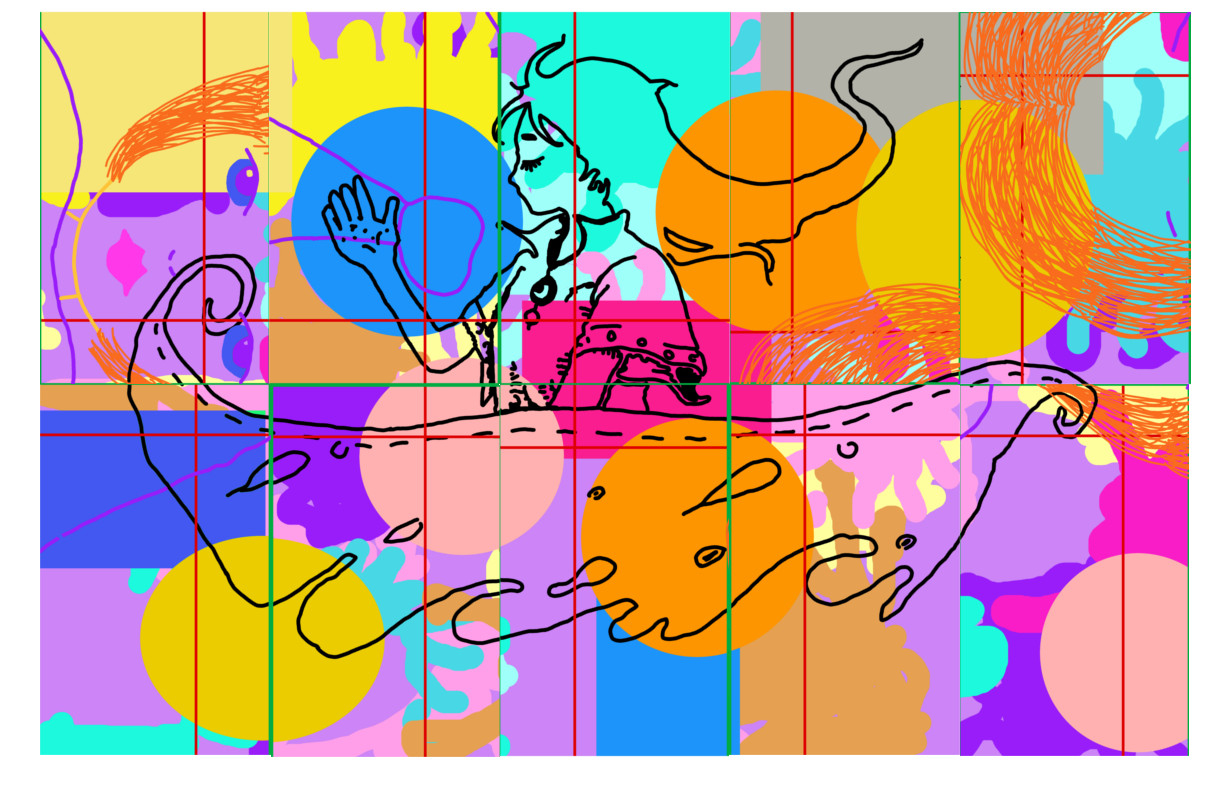
After taping the pieces, I was able to flip it over to take a look at the map, too. Here’s what it looks like:
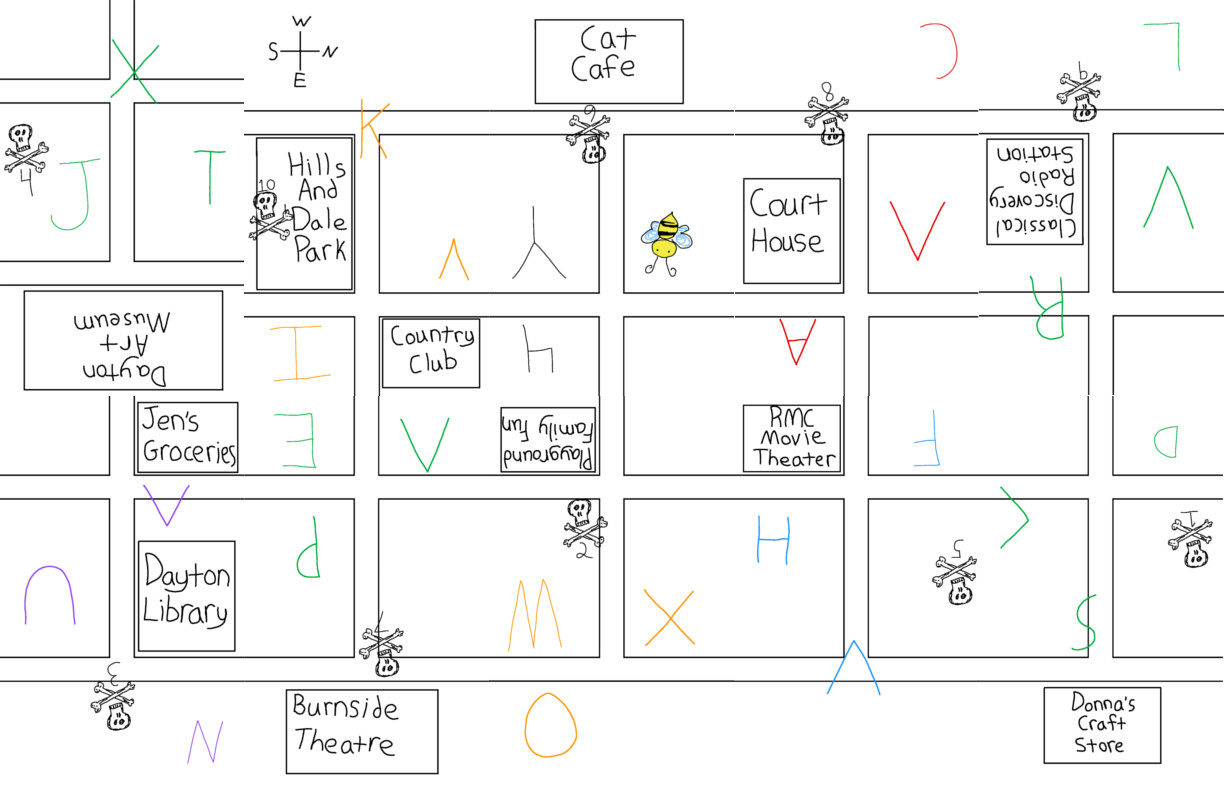
With that done, you should be able to follow the directions Clues 1-4 gave you in order to find the treasure. As much as I want to do it myself, I’m going to wait. If I don’t, I’m afraid I might run out and find the treasure myself, just to see what it is. Asuna is already competing with her bully, though, so I don’t want to make her compete with me, too. Still, you better believe I’m going to make Sullivan tell me all about the treasure (And take pictures!) once this is all over!
When you know where the treasure is, you should email Sullivan and Asuna so they can go get it. If you haven’t already, you can send them your first email at www.SleuthKings.com/Case-023. When you want to tell them where the treasure is, be sure to include the word “Solution” in the body of your email so that they know what you’re talking about.
Happy hunting, matey!